Hello! I'm Lynn.
  • About Me
  • Work With Me
  • Contact Me
  • Subscribe
  • Home
    • About
    • Contact
    • Disclaimer
    • Terms & Conditions
    • Privacy Policy
    • Subscribe
      • Work With Me
        • Media Kit
        • Portfolio and Samples
  • diy
  • lifestyle
    • home decor
  • recipes
  • gifts, parties & holidays
  • health & wellness with lynn

Lynn Mumbing Mejia

Crafting coziness, one recipe, DIY project, and holiday celebration at a time.

gifts/parties/holidays, recipes · September 3, 2024

Halloween Pretzel Bark

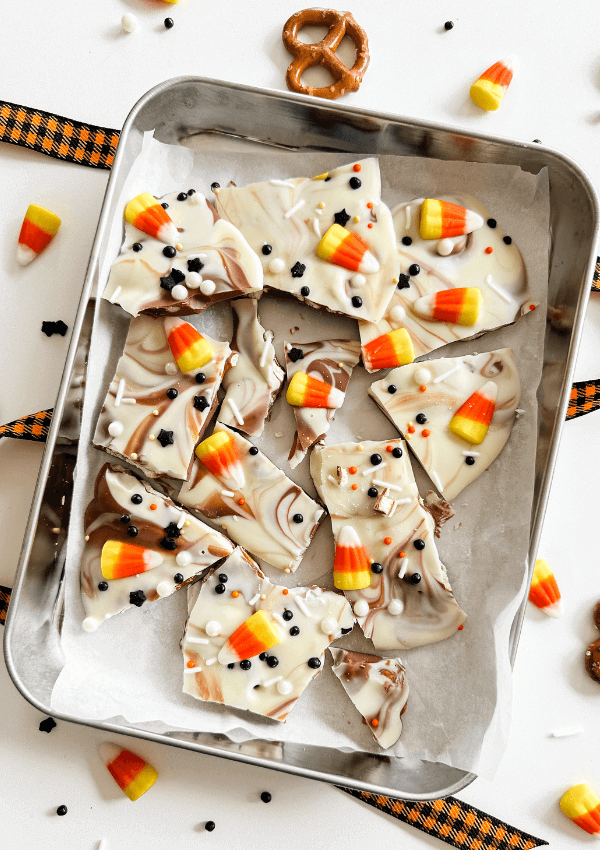
Read more for all the details on Halloween Pretzel Bark. Cozy season equals lots of movie nights and of course, movie nights equals lots of treats! What is your preferred treat? Sweet or salty? Why not both?! Halloween Pretzel Bark…

Read More

Shop The Post

recipes, gifts/parties/holidays · July 25, 2024

Easy Halloween Ice Cream Sandwich Graves

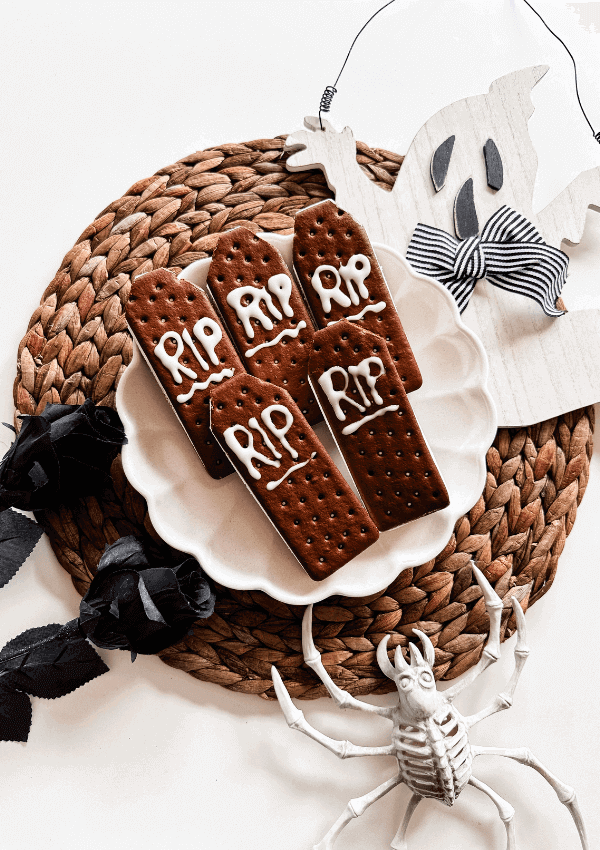
Read more for all the details on Halloween Ice Cream Sandwich Graves. Need a super easy Halloween-themed treat?! I’ve got you covered! Not only is this so easy, but it is also guaranteed delicious with no additional cooking! Halloween is…

Read More

Shop The Post

recipes · July 25, 2024

Halloween Eyeball Jello Cups

Read more for all the details on Halloween Eyeball Jello Cups. Are you a spooky or cute Halloween person?! I used to love scary movies but now I am a big scaredy cat! These Halloween Eyeball Jello Cups surely do…

Read More

Shop The Post

gifts/parties/holidays, recipes · September 2, 2023

Halloween Ice Cream Sandwiches

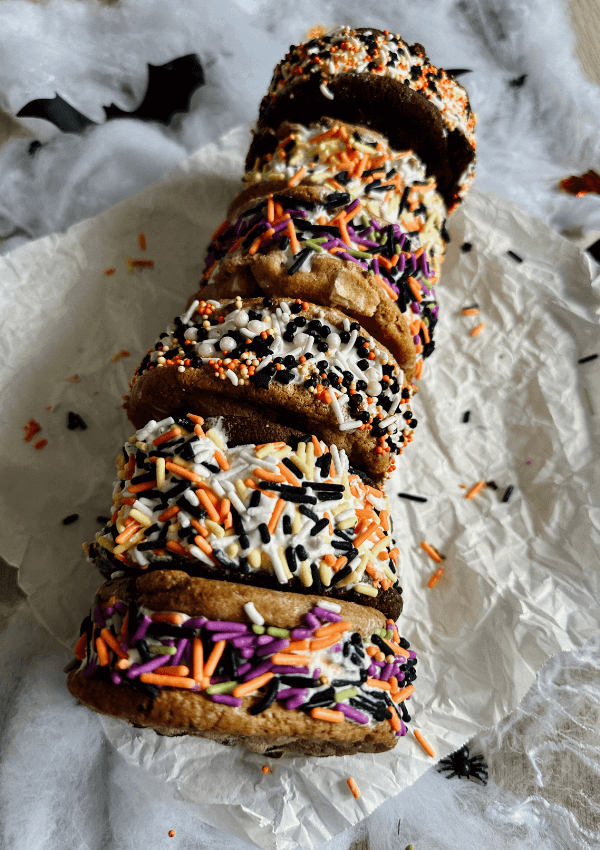
Read more for all the details on Halloween Ice Cream Sandwiches. Halloween, the season of ghosts, goblins, and delightful spookiness, is just around the corner. While traditional treats have their place, why not take your Halloween game up a notch…

Read More

SHOP THE POST

gifts/parties/holidays, recipes · September 1, 2023

Halloween Candy Corn Pretzels

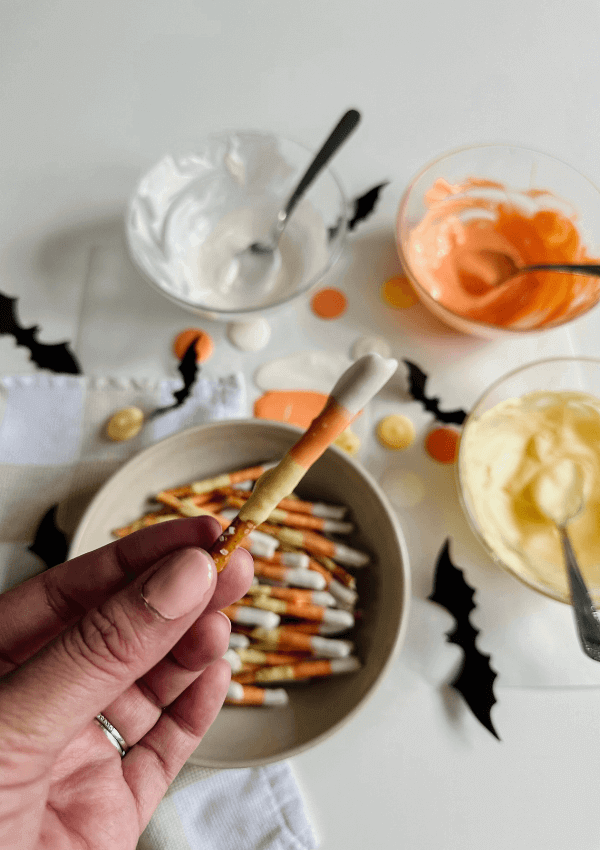
Read more for all the details on Halloween Candy Corn Pretzels. As the days grow shorter and the leaves begin to fall, it’s that enchanting time of year again – Halloween season! And what better way to celebrate than by…

Read More

SHOP THE POST
About Photo
Hey there friend! My name is Lynn and I'm a Canadian Content Creator who's focused on Minimal & Neutral Home Decor Inspo, Simple & Budget Friendly DIY Projects, All Things Holidays and Quick & Easy Recipes. I'm so happy you're here and I hope you'll find something that you love!

Categories

follow lynn

  • Facebook
  • Instagram
  • Pinterest
  • Twitter
  • YouTube

Search

Join Us!

Trending Now

Popular Posts

Links

  • About
  • Contact
  • Disclaimer
  • Privacy Policy
  • Terms & Conditions

Socials

  • Instagram
  • Youtube
  • Facebook
  • Twitter
  • Pinterest

Shop

  • Home Wall Art
  • Recipe Cards
  • Greeting Cards
  • Planner Templates

JOIN THE INNER CIRCLE

3 Ingredient Crunchy Furikake Chickpeas! High Fibe 3 Ingredient Crunchy Furikake Chickpeas! High Fiber High Protein Snack!! 🍙

INGREDIENTS
* 1/4 Cup Chickpeas (dehydrated then rehydrated for 24 hours or canned)
* 1-3 Tbsp Furikake Seasoning put as much as you’d like! I put extra on mine <3
* 1 Tbsp Avocado Oil or any oil you prefer!

INSTRUCTIONS
* In a bowl, add in your chickpeas and oil. Mix well together so that every chickpea is coated in oil.
* Add your chickpeas in a single layer in your air fryer. Air fry at 400F for about 10-15 minutes depending on your preferred level of crunch!
* Pour chickpeas into a bowl and add in your furikake seasoning to toss in.
* Serve and enjoy!


chickpeas recipe, chickpeas recipe, healthy snacks, high fiber snack, high protein snack, weight loss snack, weight loss recipes,
Easy DIY Ribbon Garland 🎀 Bows have been the o Easy DIY Ribbon Garland 🎀

Bows have been the ongoing trend for a while now and I am obsessed! I have always been girly girly and have loved bows for so long. It makes make super excited to see everyone embracing bows as a decor trend! 

STEPS TO PUT TOGETHER THIS EASY DIY RIBBON GARLAND:
Step 1: Cut Strips Of Ribbons To Your Desired Size Of Bow
I cut about 25-30cm strips and cut about 20 to 30 of these according to how long my shelf was. You can measure the place you’d like to hang your ribbon garland for more accuracy in sizing.
Step 2: Tie Your Ribbons In The Way That’s Easiest For You
I honestly watched so many ribbon tutorials and I found that this video from Tiktok was the easiest for me to follow! There are so many ways to create little bows so just pick the way that’s the easiest for you!
Step 3: Ensure That Bow Length Are Similar In Size 
I cut the ends of the bows to make sure that the bows are similar in size. It does not need to be perfect, and of course, you can leave it as is but I like to make them slightly similar in size.
Optional: I like to heat seal the edges of the ribbons or they don’t fray!
Step 4: Glue Ribbon Together To Desired Length Of Garland
Glue the sides of the bows together until they form a garland to your desired length. 
Step 5: Hang Up And Enjoy Your Craft!
Hang the garland in your desired place in your home and admire a job well done!

diy bow, bow garland, viral bow garland, diy, diy ribbon bow, satin bow garland, garland diy, bow, ribbon bow diy, garlands, how to make a bow, anthropologie satin bow garland, diy, diy crafts, easy crafts, handmade crafts,
Easy Asian Haddock Fillets! - Low Calorie, High Pr Easy Asian Haddock Fillets! - Low Calorie, High Protein Recipe + Great For Weightloss! 🐟

This Easy Asian Haddock is a simple yet flavorful dish that’s perfect for a quick weeknight dinner or a light meal. The haddock fillets are seasoned with a savory blend of soy sauce, ginger, garlic, and sesame for a perfect balance of salty and umami flavors. After a quick marinade, the fish is baked until it’s perfectly tender and flaky.

INGREDIENTS
* 3 Haddock Fillets
* 2 Tbsp Soy Sauce
* 1 Tbsp Fresh Ginger roughly chopped 
* 1 Tbsp Fresh Garlic roughly chopped 
* 1 Tbsp Sesame Oil
* 1/2 Tbsp Sesame Seeds
* 1/2 Stalk Green Onions roughly chopped

INSTRUCTIONS
Marinate
* In a small sauce bowl, add in your soy sauce, fresh ginger, fresh garlic, sesame oil, sesame seeds, and green onions and mix well together. 
* In an airtight container, gently add in your haddock fillets and pour marinade over and ensure that every piece of fish is coated. 
* Store in the fridge for minimally 20 minutes.

Bake
* Once your fish has marinated for minimally 20 minutes, preheat your oven to 400F and prepare a baking tray. 
* Place your fish on the baking tray spaced apart and pour all the marinade over top.
* Bake for 15-18 minutes or until fish is fully cooked! 
* Serve and enjoy!

haddock, haddock recipes, how to cook haddock, haddock fillets, baked haddock, asian recipe, easy recipe, asian food, food recipes, quick recipe, fast recipe, fish recipe, easy fish recipe, baked fish recipe, fish recipes for dinner, easy dinner ideas, healthy dinner ideas,
4 Ingredient Mini Chocolate Peanut Butter Puff Pas 4 Ingredient Mini Chocolate Peanut Butter Puff Pastry Bites! 🍫🥜 - Easy Peanut Butter Dessert Idea!

Mini Chocolate Peanut Butter Puff Pastry Bites are the ultimate indulgence for any sweet and savory lover. These bite-sized treats combine a crispy, golden puff pastry shell with a rich, creamy peanut butter filling, topped with sweet decadent chocolate chips. These are dangerously so good! 🫶🏼

INGREDIENTS
* 1 Puff Pastry Sheet cut into 12 mini circles 
* 3/4 Cup Peanut Butter 1 Tbsp in each puff pastry bite 
* 1/4 Cup Semi-sweet Chocolate Chips 4-5 chocolate chips in each puff pastry bite 
* 1 Tbsp Powdered Sugar

INSTRUCTIONS
* Preheat oven to 375F and prepare your mini muffin pan. 
* Cut out 12 mini circles or shapes out of your puff pastry and place each in a mini muffin pan. Make sure that the bottom is pushed down inside the mold. One sheet for me allowed me to cut out 12 flower shapes. 
* Add a Tbsp of peanut butter into each tart and add in 4-5 chocolate chips in each.
* Bake for 12-15 minutes or until the puff pastry is golden brown. 
* Let cool for a few minutes then sift powdered sugar on top. Serve and enjoy!

peanut butter, peanut butter dessert ideas, chocolate peanut butter 4 ingredient desserts, 3 ingredient desserts, simple dessert recipes, peanut butter dessert recipes, quick dessert recipes, puff pastry recipe, chocolate puff pastry, easy puff pastry, pastry baking, puff pastry snacks, puff pastry desserts, simple puff pastry recipes,

Copyright © 2025 Lynn Mumbing Mejia · Theme by 17th Avenue