
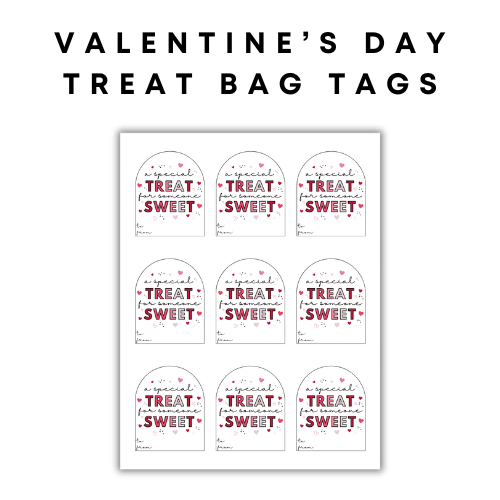
Read more for all the details on Easy Valentine’s Day Treat Bag Tags.
Remember in elementary school where you had the option of giving your fellow classmates a treat for Valentine’s Day?! I loved picking out some treats for my classmates with my mom and delivering them on Valentine’s Day!
My mom would always ask me every year what I wanted to give out this year and I’d alternate between making my own bags and selecting my own treats to give or using the fun character Valentine’s Day cards!
I thought of creating Easy Valentine’s Day Treat Bag Tags to satisfy my crafty heart. These tags are perfect if you’re hosting a galentine’s day gathering or just want to spread some cheer to coworkers or others in your life!
I always try and make everything I do super affordable so everything that I used to make these came from the Dollar store and was under $15! I also just printed these tags from home on my printer. Homemade gifts always make my heart smile!
PIN Easy Valentine’s Day Treat Bag Tags FOR LATER:

This Easy Valentine’s Day Treat Bag Tags is accompanied by a TikTok Tutorial. If you haven’t followed me on TikTok, don’t forget to!
HERE IS HOW TO MAKE EASY VALENTINE’S DAY TREAT BAG TAGS:
WHERE CAN I FIND THESE MATERIALS?
You can find the materials for Easy Valentine’s Day Treat Bag Tags at various locations:
- Craft Stores: Visit local craft stores for a wide selection of colored paper, cardstock, stickers, stamps, ribbons, and other decorative elements.
- Office Supply Stores: Basic crafting materials like markers, glue, and scissors are available in office supply stores.
- Supermarkets: Some supermarkets carry basic crafting supplies, such as colored paper and markers, in their stationery aisle.
- Online Retailers: Explore online platforms for a broader selection of crafting materials. You can find unique embellishments and order specific colors or designs.
WHERE CAN I PRINT THESE VALENTINE’S DAY TREAT TAGS?
You can get all my freebies by signing up for my email list here or clicking on the photo! All email list subscribers have access to all the printables I create forever so be sure to check it out  Once you sign up, you get a welcome email with the password to my freebie library where you can download these tags!
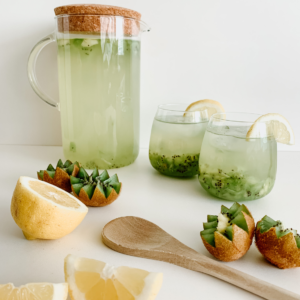
WHAT ARE THE MATERIALS?
The materials you need to create these cute Valentine’s day treat bag are:
- Paper
- Printer/Ink
- A few treats/toys of your choosing
- Ribbon
- Small Clear Bags
WHAT EQUIPMENT DO I NEED?
If you’ve got a printer at home, I suggest printing these tags at home! If not, you can always get them printed from your local library or print shop for a small cost. Other than that, you’ll need some standard crafting supplies like scissors to cut the bag tags and (although I did not use any) some tape or glue is handy for any project! Also, not necessary but I used a hole puncher to insert the ribbon through the tag you can also just cut a slit or your own small circle!
Here are some of my Amazon favs!

HOW LONG DOES IT TAKE TO MAKE?
Making Easy Valentine’s Day Treat Bag Tags is a quick and enjoyable craft. The time required depends on your chosen design and complexity. On average, crafting a set of tags can take anywhere from 30 minutes to an hour. It’s a delightful and efficient way to add a personal touch to your Valentine’s Day gifts.
I usually love doing crafts when I’m having a night in and just keep my hands busy while I’m watching TV. A good trick is to do all the cutting first like the tags and ribbons as this takes up the most time then add all the treats in the bags and tie them together!
WHAT ARE THE STEPS?
Step 1: Print Treat Tags
Sign up for my email list here for the password for all the printables including these Valentine’s treat tags! Print them at home or at a print shop. Write the information in the To: and From: section.
Step 2: Cut Ribbons And Treat Tags
It’s easier to do all the cutting first as it takes the longest so cutting all your ribbons the same length and cutting all the treat tags first is the best however, do it in the order you feel comfortable with! Hole punch each of the treat tags at the top of the tag to insert the ribbons in.
Step 3: Assemble Treats In Bag
Arrange your treats in your clear bag to showcase the way you want them! Generally, it’s the taller items in the bag and smaller items at the front so every time can be shown.
Step 4: Use Ribbon To Attach Tag And Tie Bag
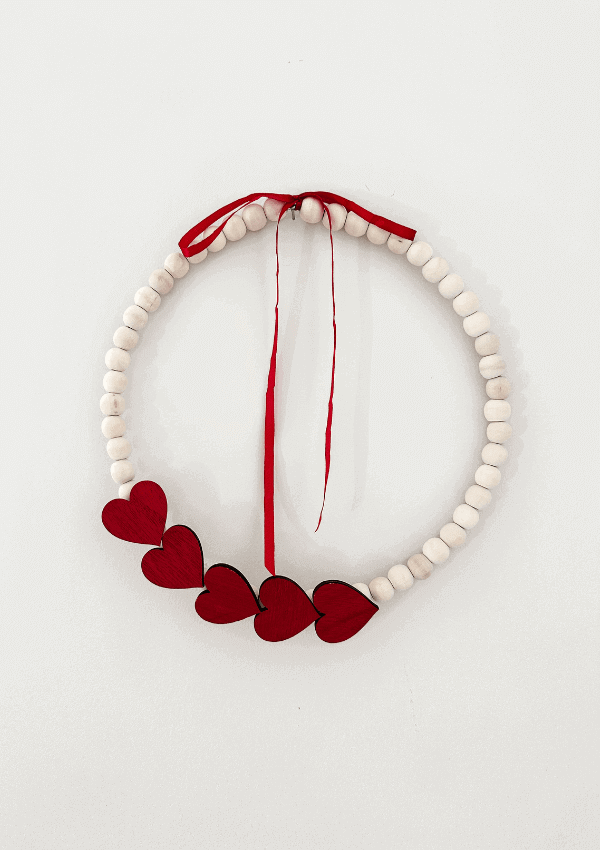
Once all your treat bags are filled, go ahead and close the bag by wrapping a ribbon around the top and adding your tag. Bonus points are curling the ribbon strands if you can!
Yay! You’re done and have the cutest treat bags for Valentine’s day! Let your heart guide your hands in crafting these Easy Valentine’s Day Treat Bag Tags. May your gifts carry the warmth of handmade love. Happy crafting and a joyful Valentine’s Day!
Xo,
Lynn
Are you going to try and make these Easy Valentine’s Day Treat Bag Tags?! Don’t forget to tag me if you do!

This blog post is all the details on Easy Valentine’s Day Treat Bag Tags.
P.S: If you haven’t read my most recent post, click here!
PIN Easy Valentine’s Day Treat Bag Tags FOR LATER:

If you liked reading Easy Valentine’s Day Treat Bag Tags, you might like these are well!
Valentine’s Day Cake Mix Cookies
14 Fun Valentine’s Day Date Ideas
20 Valentine’s Day Painting Ideas For Couples
Sweet and Salty Valentine’s Day Chocolate Bark
50+ Gorgeous Valentine’s Day Gift Ideas
How to Make A Valentine’s Day Treat Charcuterie Board
5 Inexpensive Valentine’s Day Home Decor
This is the end of Easy Valentine’s Day Treat Bag Tags.


 Bows have been the o


Aww, they’re adorable!
The Reluctant Blogger | thereluctantblogger.co.uk
Love this idea, it’s super cute and looks easy to do! I absolutely love your posts and look forward to reading the others ones, especially the Valentine’s Day cake mix cookies. Love that you have all these Valentine’s Day ideas
These treat bags are such a cute idea! I love that different things can be put in and tailored to taste, etc. Thanks for sharing this, I’m getting excited for Valentine’s Day!